
![ASM[03] — [x86-64] Assembly Language: Understanding Instructions, Registers and the read Syscall](https://appsecwriteups.com/wp-content/uploads/2026/10/Screenshot-2026-10-05-at-9.59.41-AM-scaled.png)
Hey everyone, in this write-up, I will explain x86-64 assembly language, specifically how to get user input in assembly language using the read syscall.
In the previous write-up, ASM[02], I explained how to write a message on the screen using x86-64 assembly. Now, in this write-up, I will explain how to read user input and store it in memory using x86-64 assembly.
Please note that in this write-up, I am using some instructions from the previous assembly write-up to print a message on the screen using the write syscall.
If you haven’t read the ASM[02] write-up yet, I recommend reading it first because this write-up will mostly focus on the read syscall.
I hope you have already read the ASM[02] write-up and are comfortable with the basic Assembly syntax, instructions, and registers used to print a message on the screen.
As you can see, our initial code starts with:
global _startThen, we use different sections such as .text and .data.
In the .text section, we write our x86-64 instructions and work with registers. For example:
mov rax, 1This tells the CPU that we are preparing to use the write syscall. We also use the exit syscall to terminate the program.
Then, we use the .data section to define labels and store the messages that we want to print on the screen.
You can see the basic x86-64 Assembly structure below:
global _start

section .text

_start:

	;Print Msg To Show Input Msg

	mov rax, 1
	mov rdi, 1
	mov rsi, input_msg
	mov rdx, input_msg_len
	syscall

	;Take User Input via read syscall


	;Say Hello with User Name

	mov rax, 1
	mov rdi, 1
	mov rsi, say_hello
	mov rdx, say_hello_len
	syscall

	;Print User Input on screen


	;exit from program

	mov rax, 60
	mov rdi, 0
	syscall

section .data

	input_msg: db "Enter Your Name: "
	input_msg_len: equ $-input_msg

	say_hello: db "Hello Mr."
	say_hello_len: equ $-say_hello
Now, in the above Assembly program, I have already created the write syscall, which prints the messages “Enter Your Name: “ and “Hello Mr.” on the screen. Now I will use the read syscall because I want to read user input from the keyboard. After the first syscall prints “Enter Your Name: “, I want to use the read syscall
so the user can enter their input. For this, we can use: mov rax, 0 Note that in our write syscall, we use:mov rax, 1 Here, 0 is used for the read syscall, while 1 is used for the write syscall. These syscall numbers are also defined in the Linux x86-64 syscall header file: cat /usr/x86_64-linux-gnu/include/asm/unistd_64.h
As you can see in the attached screenshot, it contains:#define __NR_read 0
#define __NR_write 1
That’s why we use 0 in RAX when we want to use the read syscall: mov rax, 0
Advanced Real Bug Bounty Case Studies – Volume 1
Learn bug bounty hunting through real vulnerability case studies. Discover how XSS, HTML Injection, IDOR, and Broken Access Control vulnerabilities are identified, validated, and responsibly reported using practical, real-world examples instead of intentionally vulnerable labs.
So, our read syscall instruction looks like this:
mov rax, 0
mov rdi, 0
mov rsi, buffer
mov rdx, 50
syscall
Now, let me explain each instruction.
First, we use:
mov rax, 0As we already discussed, RAX = 0 means that we want to use the read syscall.
Then we use:
mov rdi, 0In the write syscall, we use:
mov rdi, 1where 1 represents stdout, which means standard output on the screen.
For the read syscall, we use:
mov rdi, 0where 0 represents stdin, which means standard input or the keyboard.
Next, we use:
mov rsi, bufferHere, buffer is the label for the memory location where we want to store the user’s input when the read syscall is executed.
In our write syscall, we use something like:
mov rsi, msgbecause we are telling the write syscall where the message we want to print is located.
For example:
mov rsi, msgmeans that RSI contains the address of our msg data.
But in the read syscall:
mov rsi, bufferwe are telling where the input should be stored.
So, when the read syscall is executed and the user types something and presses Enter, the input will be stored in the memory area represented by the buffer label.
Please note that buffer is just a label, similar to msg or msg_len. You can use different names for it.
For example:
buffer: resb 100or:
getuserinput: resb 100Both are valid. The label name is up to you. buffer is simply a common name because this memory area is being used as a buffer to store input.
Next, we use:
mov rdx, 50This is similar to how we use RDX in the write syscall.
For example, in write we might have:
mov rdx, msg_lenThis tells write how many bytes we want to print.
For read, we use:
mov rdx, 50This tells the read syscall the maximum number of bytes it should read into the buffer.
So the difference is:
write:
RDX = how many bytes to print

read:
RDX = maximum number of bytes to read
However, there is one important thing to understand here.
We are using:
mov rdx, 50but our buffer needs to have enough memory available to store those bytes.
This is where the .bss section comes in.
Unlike our msg label, the buffer does not contain a predefined message.
For example, we can define our message in .data:
section .data
    msg: db "Hello World"
Here, the data is already known when we assemble the program.
But for buffer, we don’t know what the user is going to type. We need to reserve some memory where the input can be stored.
For this, we can use the .bss section:
section .bss

    buffer: resb 100
Here:
buffer: resb 100means that we reserve 100 bytes of memory for buffer.
The resb instruction means reserve bytes. so: resb 100 means Reserve 100 bytes of memory.
Now our program has:
.bss
   ↓
buffer
   ↓
100 bytes of memory
   ↓
read syscall stores user input here
For example, if the user enters:
Jivanthe input is stored inside the memory area represented by buffer.
So the complete read syscall:
mov rax, 0
mov rdi, 0
mov rsi, buffer
mov rdx, 50
syscall
And our buffer is created separately in .bss:
section .bss

    buffer: resb 100
Here we have reserved 100 bytes, while the read syscall is currently configured to read a maximum of 50 bytes.
Now we need to add the read syscall after Enter your Name sycscall is complete like this
global _start

section .text

_start:

	;Print Msg To Show Input Msg

	mov rax, 1
	mov rdi, 1
	mov rsi, input_msg
	mov rdx, input_msg_len
	syscall

	;Take User Input via read syscall

	mov rax, 0
	mov rdi, 0
	mov rsi, buffer
	mov rdx, 50
	syscall
	;Say Hello with User Name

	mov rax, 1
	mov rdi, 1
	mov rsi, say_hello
	mov rdx, say_hello_len
	syscall

	;Print User Input on screen


	;exit from program

	mov rax, 60
	mov rdi, 0
	syscall

section .data

	input_msg: db "Enter Your Name: "
	input_msg_len: equ $-input_msg

	say_hello: db "Hello Mr."
	say_hello_len: equ $-say_hello

section .bss

	buffer: resb 100
Now we have completed the read syscall and also defined the required buffer size for our buffer label, as you can see in the code above.
When the program runs, it first prints the message “Enter Your Name: “ on the screen. Then, it executes the second syscall, which is the read syscall. This allows the user to enter their input, and the input is stored in the buffer.
After that, the program execution moves to the Say Hello syscall and then eventually to the exit syscall.
However, we also want to print the user’s input on the screen after the user enters it. Since the input is already stored in our buffer, we can access that buffer and print its contents using another write syscall.
We can use:
mov rax, 1
mov rdi, 1
mov rsi, buffer
mov rdx, r8
syscall
You can see that this is another write syscall, but this time we are using buffer instead of our predefined message.
Let’s understand why we are using the R8 register here.
Advanced Real Bug Bounty Case Studies – Volume 1
Learn bug bounty hunting through real vulnerability case studies. Discover how XSS, HTML Injection, IDOR, and Broken Access Control vulnerabilities are identified, validated, and responsibly reported using practical, real-world examples instead of intentionally vulnerable labs.
If you look at our previous read syscall:
mov rax, 0
mov rdi, 0
mov rsi, buffer
mov rdx, 50
syscall
we use RSI to provide the address of the buffer, where the user’s input will be stored.
But there is another important thing that happens after the read syscall finishes.
The read syscall returns a value in the RAX register. This return value tells us how many bytes were actually read.
For example, if the user enters:
Jivanthe input normally includes the Enter/newline character, so the number of bytes read can be: 6
Therefore, after the read syscall:
RAX = 6We need this value later because the write syscall needs to know how many bytes it should print.
The problem is that we need to use RAX again for another syscall.
For example, our Say Hello write syscall starts with:
mov rax, 1This changes the value of RAX.
So, before using RAX for the next syscall, we save the return value from read into another register:
mov r8, raxThis copies the value from RAX into R8.
For example: After read syscall: RAX = 6
Then: mov r8, rax gives us: R8 = 6
Now we can safely change RAX:
mov rax, 1because the number of bytes read is already saved in R8.
After printing “Hello Mr.”, we can use another write syscall:
mov rax, 1
mov rdi, 1
mov rsi, buffer
mov rdx, r8
syscall
This is why we use the R8 register here. We are using it to preserve the return value from the read syscall while we use RAX for the next syscalls.
You could manually put a number in RDX, for example:
mov rdx, 6but that would be a manual approach. The length of the user’s input can change every time, so using the return value from read is much more useful. By saving: mov r8, rax
we can automatically use the actual number of bytes that read received.
Our final code now looks like this:
global _start

section .text

_start:

	;Print Msg To Show Input Msg

	mov rax, 1
	mov rdi, 1
	mov rsi, input_msg
	mov rdx, input_msg_len
	syscall

	;Take User Input via read syscall

	mov rax, 0
	mov rdi, 0
	mov rsi, buffer
	mov rdx, 50
	syscall

	;Store return value for read syscall for RAX register

	mov r8, rax

	;Say Hello with User Name

	mov rax, 1
	mov rdi, 1
	mov rsi, say_hello
	mov rdx, say_hello_len
	syscall

	;Print User Input on screen

	mov rax, 1
	mov rdi, 1
	mov rsi, buffer
	mov rdx, r8
	syscall


	;exit from program

	mov rax, 60
	mov rdi, 0
	syscall

section .data

	input_msg: db "Enter Your Name: "
	input_msg_len: equ $-input_msg

	say_hello: db "Hello Mr."
	say_hello_len: equ $-say_hello

section .bss

	buffer: resb 100
Now the program can take the user’s input, store it in memory, preserve the number of bytes returned by read, and then use that value when printing the input back to the screen.
Now save this file with the .nasm extension, as shown in the screenshots below.
nano input.nasm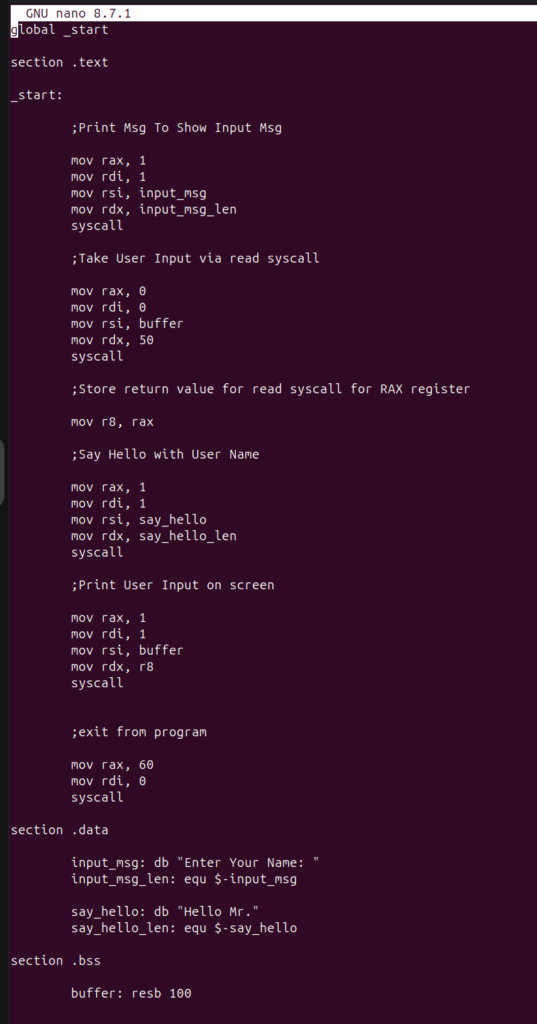
Use NASM to create the object file:
nasm -f elf64 input.nasm -o input.oLink the object file to create the executable:
x86_64-linux-gnu-ld input.o -o inputSince I am working on an ARM64 system, I use the x86_64-linux-gnu-ld linker for the x86-64 target. If your system is already x86-64, you can normally use ld instead:
ld input.o -o inputRun the executable:
./inputOutput
Enter Your Name: AppSecWriteups.com
Hello Mr.AppSecWriteups.com
That’s it! Our x86-64 Assembly program can now take input from the user. We have learned how to use the read syscall, store user input in a buffer, save the number of bytes returned by read, and use that value with the write syscall to print the input.
Conclusion
That’s it! Our x86-64 Assembly program is now complete.
In this part, we learned how to:
- Use the Linux
readsyscall to take user input - Use
RDI,RSI, andRDXwith thereadsyscall - Create a buffer using the
.bsssection andresb - Understand that
RAXcontains the number of bytes read - Save the
readreturn value in theR8register - Use the saved value with the
writesyscall - Assemble, link, and run our x86-64 Assembly program
This is another step in learning how Assembly works at the syscall level. In the next part, we will continue learning x86-64 Assembly step by step with more practical examples.
Thanks for reading, and see you in the next part!

![ASM[02] — [x86-64] Assembly Language: Understanding Registers and Writing Our First Program](https://appsecwriteups.com/wp-content/uploads/2026/10/Screenshot-2026-10-03-at-7.13.27-AM-150x150.png)