
![ASM[02] — [x86-64] Assembly Language: Understanding Registers and Writing Our First Program](https://appsecwriteups.com/wp-content/uploads/2026/10/Screenshot-2026-10-03-at-7.13.27-AM-scaled.png)
Hello, I am Jivan, and in this writeup, you will learn about x86-64 Assembly by running your first Assembly program. In the previous writeup, we saw how to set up the required tools for practicing x86-64 Assembly Language. In this writeup, we will start our first Assembly practice. We will write, build, and run a simple Assembly program and understand why we use specific instructions and registers. This practice will help you understand the basics of Assembly Language and start writing your own Assembly programs.
Let’s start by writing our first Assembly program step by step.
Just like high-level programming languages have their own basic syntax and program structure, Assembly also follows some basic rules.
Our first program starts with: global _start
Here, _start is the name of a symbol that we will use as the entry point of our program.
We can think of it as being similar to main() in a simple C program because it is where our program begins execution. However, _start is not a mandatory Assembly keyword. It is a commonly used name for the entry point of a Linux program when we are writing the program directly in Assembly without using the C runtime. The _ in _start is just an underscore character and is part of the symbol’s name. It does not have any special meaning here.
We could use another name, such as: global my_start
But if we use a different name, we also need to tell the linker to use that symbol as the entry point. For example: x86_64-linux-gnu-ld hello.o -o hello -e my_start For this series, we will use the conventional _start name to keep our programs simple.
So for now, remember:
_start → name commonly used for the program entry point_ → just part of the nameglobal → makes the symbol visible to the linker
So, our first line of code is:
global _startNow, after this, we need to define the sections of our program.
section tells the assembler which part of the program the following code or data belongs to, such as .text for instructions and .data for stored data.
We write them like this:
section .text
section .data
In our first Assembly program, we need both sections. So our code currently looks like this:
global _start

section .text

section .data
Now our initial Assembly syntax is ready. Next, we need to write our first instruction inside the .text section.
As mentioned above, the .text section is where we write our instructions that the CPU will execute.
Before writing our instructions, we need to define _start inside the .text section. This tells the linker where our program should start executing.
Our updated code looks like this:
global _start

section .text

_start:

section .data
Now, before writing our first instruction and using registers, we need to understand what instructions and registers are in Assembly. This will make it easier to understand how our program works.
So, an instruction tells the CPU what operation to perform, while a register is a very small and very fast storage location inside the CPU. We use registers to temporarily hold values that the CPU needs while executing instructions.
For example:
mov rax, 1Advanced Real Bug Bounty Case Studies – Volume 1
Learn bug bounty hunting through real vulnerability case studies. Discover how XSS, HTML Injection, IDOR, and Broken Access Control vulnerabilities are identified, validated, and responsibly reported using practical, real-world examples instead of intentionally vulnerable labs.
Here, mov is the instruction and rax is the register. This means we are moving the value 1 into the RAX register using the mov instruction. But in our program, this 1 is not just a normal number. It is the Linux x86-64 system call number for write. In simple words, write is the system call we use to tell Linux to write or display data, such as our text, on the screen.
Now I hope your doubt about instructions and registers is clear. Let’s discuss more about the registers we are using in our program.
In our program, we are using the RAX, RDI, RSI, and RDX registers.
Please note that x86-64 Assembly has many other registers, but for our current program, which only prints a simple message on the screen, we don’t need to use all of them.
Before going further, let’s understand why we picked these registers and why we need them.
First, we use the RAX register:
mov rax, 1Here, we move 1 into RAX. For a Linux x86-64 system call, RAX holds the system call number.
In this case, 1 means the write system call. This tells Linux which system call we want to use.
Next, we use the RDI register:
mov rdi, 1RDI holds the first argument of the system call.
Here, 1 means standard output (stdout). In simple words, we want to send our output to the terminal.
Notice that the 1 in these two instructions has a different meaning:
mov rax, 1    ; 1 = write system call
mov rdi, 1    ; 1 = stdout
The number is the same, but its meaning is different because it is being used for a different purpose.
Next, we use the RSI register:
mov rsi, msgRSI holds the second argument.
Here, we pass msg, which represents the address of the message that we want to print.
Finally, we use the RDX register:
mov rdx, msg_lenRDX holds the third argument.
Here, we pass msg_len, which contains the length of our message. This tells Linux how many bytes it should write.
So, the write system call uses these registers like this:
RAX → 1                 → write system call
RDI →  1                 → stdout
RSI →   msg           → address of our message
RDX → msg_len    → message length
After putting all the required values into the correct registers, we use:
syscallThis asks Linux to perform the write system call using the values we placed in the registers.
Now let me explain why I use these registers, why I use only these registers, and why I use these instructions and arguments.
To understand this more easily, let’s first look at the attached screenshot of a simple C program. This will help you understand how the Assembly instructions and registers are related to what we are doing in our program.
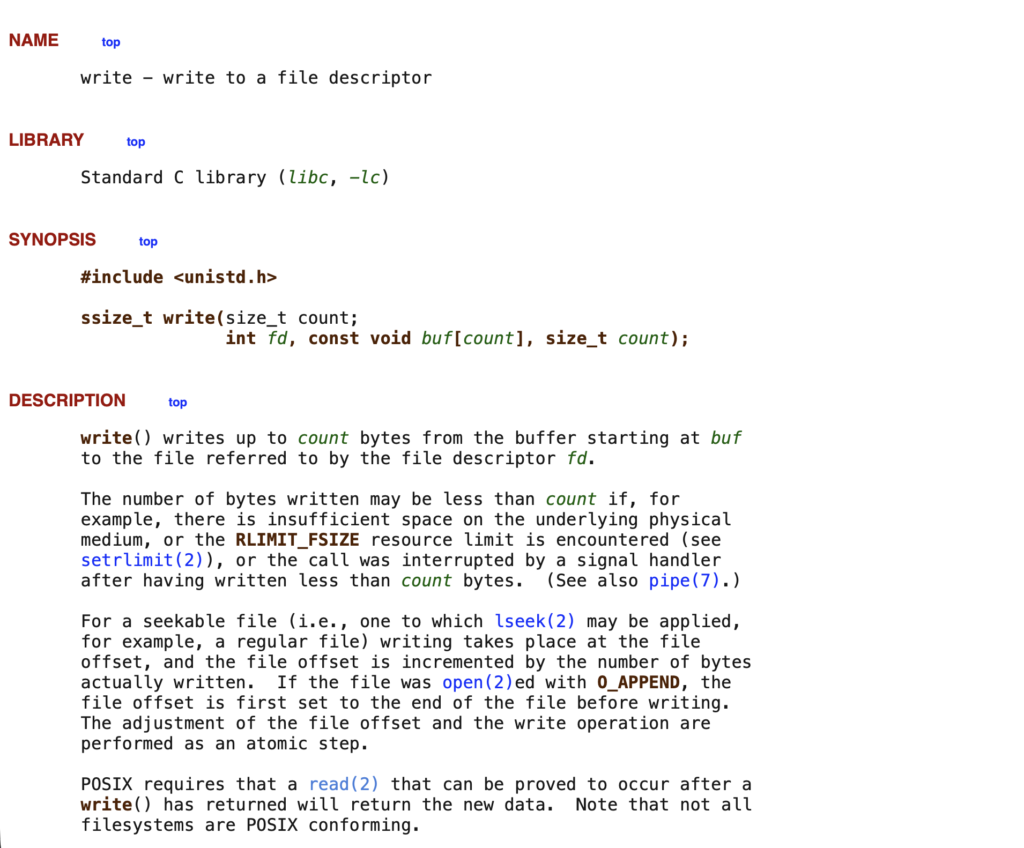
As you can see in the above C syntax for this.
#include <unistd.h>

       ssize_t write(size_t count;
                     int fd, const void buf[count], size_t count);
In the above C code, you can see why we need these registers. These registers are enough for us to create and use the write system call in our Assembly program.
Now let’s look at the write() function in the C code above.
The write() function is what we want to perform in our Assembly program. This is why we use:
mov rax, 1Here, 1 is the defined system call number for write on x86-64 Linux. It is not a random value.
You can also find the system call numbers for read, write, and other Linux system calls in Ubuntu using: cat /usr/x86_64-linux-gnu/include/asm/unistd_64.h
In this file, you can see that: __NR_write 1 This means that 1 is the system call number for write.
You can see this in the second attached screenshot.
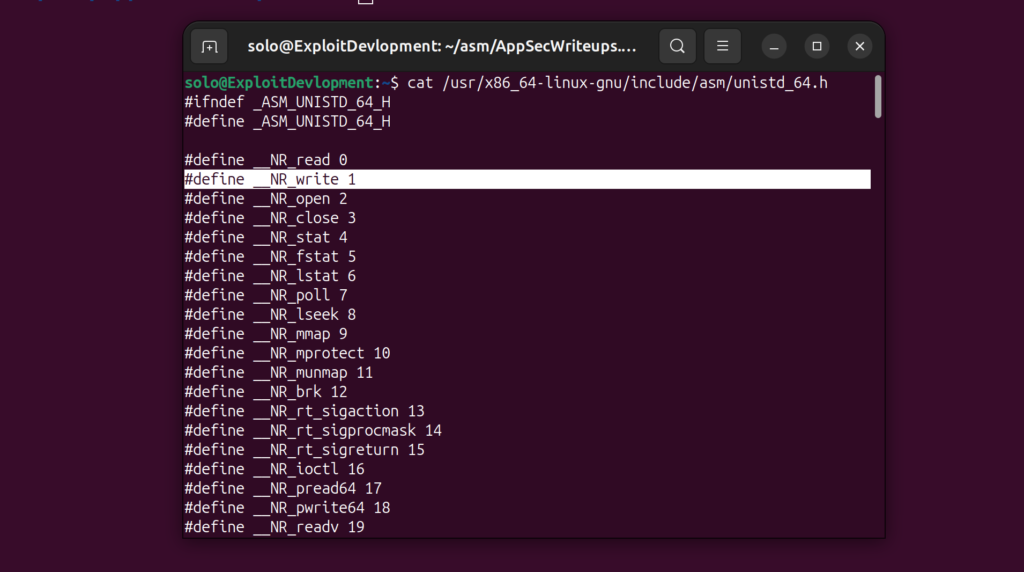
Now, let’s look at the write() function:
write(int fd, const void *buf, size_t count)The write() function takes three arguments:
fd    → where to write
buf   → what data to write
count → how many bytes to write
For our program, we can write:
write(1, msg, msg_len);Here:
1               → stdout (terminal)
msg         → address of our message
msg_len  → length of our message
These three arguments are passed to specific registers in x86-64 Linux:
C                         Assembly Register

1        ───────────────→  RDI
msg      ───────────────→  RSI
msg_len  ───────────────→  RDX
So our complete Assembly code becomes:
mov rax, 1                ; write syscall
mov rdi, 1                 ; fd = stdout
mov rsi, msg            ; buf = message address
mov rdx, msg_len    ; count = message length
syscall
We can understand the Assembly code like this:
RAX = 1             → Which syscall?
RDI = 1             → Where to write?
RSI = msg           → What data?
RDX = msg_len       → How many bytes?
syscall             → Perform the syscall
This is why we are using RAX, RDI, RSI, and RDX in our program. Each register has a specific role when making a Linux x86-64 system call.
Note: In C, write() provides a convenient function interface. In our Assembly program, we prepare the required values in registers and then use the syscall instruction to request the operation from the Linux kernel.
so after this orur assembly program looks like this
global _start

section .text

_start:

	;To Print Message On Screen

	mov rax, 1
	mov rdi, 1
	mov rsi, msg
	mov rdx, msg_len
	syscall

section .data
Please note that when working with Assembly, these registers are commonly used, and they are also required when working with Linux system calls.
In our program, RSI and RDX are holding the message address and message length, while RAX and RDI are used for different values. For example, RAX is mainly used to hold the system call number when using Linux system calls.
However, this does not mean that RAX can only hold system call numbers. A register can hold different values depending on what we are doing.
Before the syscall instruction is executed, we need to make sure that RAX contains the correct system call number. If RAXalready contains another value that we need, we must first move or save that value to another register or memory location. Then, we can set RAX to the required system call number:
mov rax, 1Here, 1 is the system call number for write on x86-64 Linux.
Now, in our program, we have completed our first syscall for write, but we have not defined msg and msg_len yet. Without defining these, our program cannot be assembled correctly.
To define them, we need to use the .data section, where we can store our message and calculate its length.
In the .data section, we use a label to define our message. The label we used earlier in the RSI register is msg, so we need to use the same label here:
msg: db "First Assembly Language Program for x86_64!"Here, msg is the label for our message, and db means Define Byte. It stores the characters of our message as bytes in memory.
Next, we need to calculate the length of the message. Instead of manually counting each byte, we can use equ:
msg_len: equ $-msgHere, $ represents the current assembly position, while msg represents the starting position of our message.
The expression $-msg subtracts the starting position of msg from the current position. This gives us the total number of bytes occupied by our message.
The calculated value is assigned to msg_len, so we can use msg_len in our RDX register:
mov rdx, msg_lenThis tells the write system call how many bytes of our message should be written.
So, our code now looks like this:
global _start

section .text

_start:

	;To Print Message On Screen

	mov rax, 1
	mov rdi, 1
	mov rsi, msg
	mov rdx, msg_len
	syscall

section .data

	msg: db "First Assembly Language Program for x86_64!"
	msg_len: equ $-msg
Now, we have completed the .data section and the write syscall. But after completing the write syscall, we also need to tell the program to exit.
For this, we need to use the Linux exit syscall. We can do this using the mov instruction:
mov rax, 60Please note that we are using the RAX register again, but this time with the value 60.
Previously, we used:
mov rax, 1Here, 1 tells Linux that we want to use the write syscall. Now we use:
mov rax, 60Here, 60 tells Linux that we want to use the exit syscall.
Using the same RAX register again is completely allowed in Assembly. When our program starts from _start, the CPU executes the instructions one by one.
First, we set RAX to 1 and execute the write syscall. Once that syscall has been executed, we can reuse RAX and put a new value into it:
mov rax, 60We are now finished with the previous value 1, so we can overwrite it with 60 for the exit syscall.
The syscall number 60 can also be found in the x86-64 Linux syscall definitions: cat /usr/x86_64-linux-gnu/include/asm/unistd_64.h You can check this file to see the syscall numbers for write, exit, and other Linux system calls. You can also see this in the screenshot.
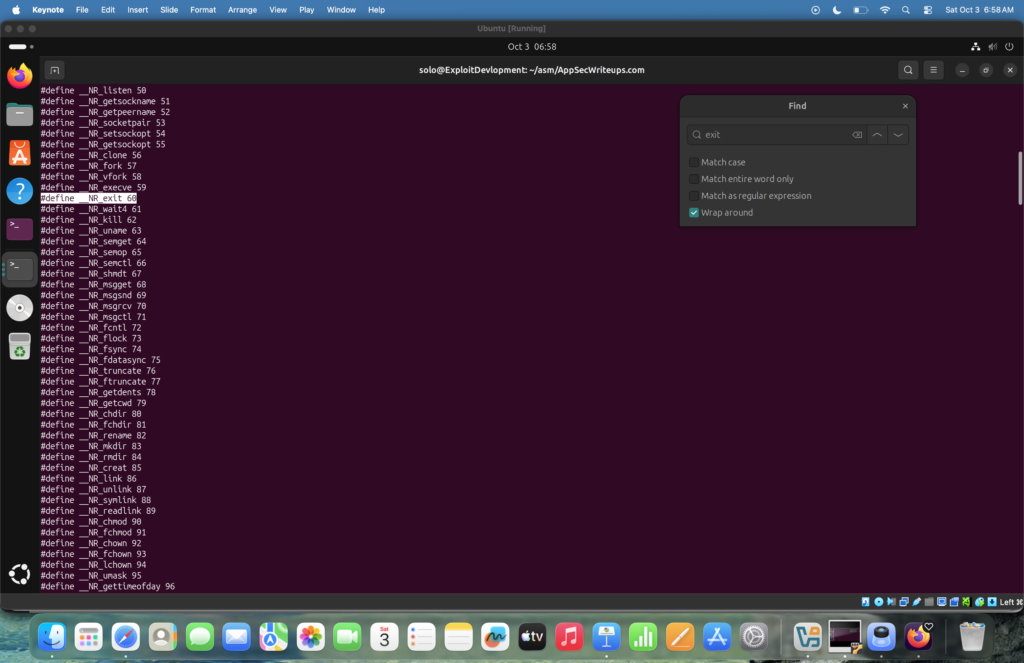
Now, we set RAX to 60 for the exit syscall. For RDI, we can use different values such as 0, 11, or other integer values. The value is not fixed because RDI holds the exit status code for the exit syscall.
For example, we can use:
mov rax, 60
mov rdi, 11
syscall
Here, 60 tells Linux that we want to use the exit syscall, while 11 is the exit status code. We could also use 0 or another value depending on the exit status we want to return.
Advanced Real Bug Bounty Case Studies – Volume 1
Learn bug bounty hunting through real vulnerability case studies. Discover how XSS, HTML Injection, IDOR, and Broken Access Control vulnerabilities are identified, validated, and responsibly reported using practical, real-world examples instead of intentionally vulnerable labs.
That’s it. Now our complete final Assembly program looks like this:
global _start

section .text

_start:

	;To Print Message On Screen

	mov rax, 1
	mov rdi, 1
	mov rsi, msg
	mov rdx, msg_len
	syscall

       ;To Exit From Program

	mov rax, 60
	mov rdi, 11
	syscall

section .data

	msg: db "First Assembly Langauge Program For x86_64!"
	msg_len: equ $-msg
Now, save this program with the .nasm extension. See the attached screenshot.
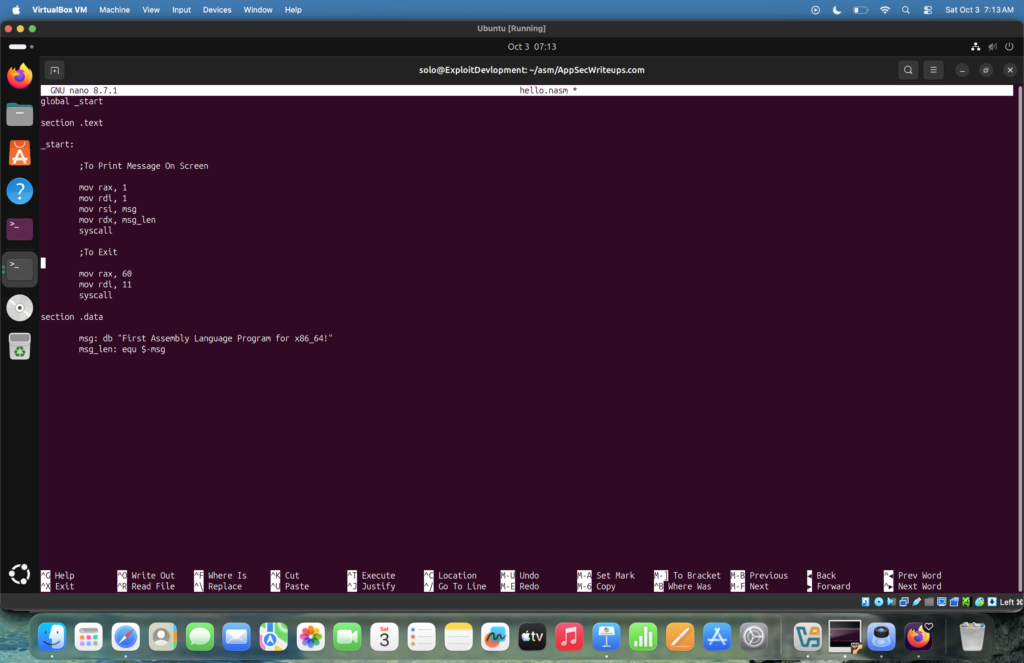
Now, first we need to assemble our .nasm file using the NASM tool. We can do this with the following command:
nasm -f elf64 hello.nasm -o hello.oThis will create the hello.o object file.
Next, we need to link the hello.o file using the ld linker to create the final executable.
If you are using an x86-64 Ubuntu system, you can simply use:
ld hello.o -o helloThis will create the hello executable.
However, if you are running Ubuntu on an Apple Silicon Mac with an ARM64/aarch64 architecture, you need to use the x86-64 linker:
x86_64-linux-gnu-ld hello.o -o helloThis creates an x86-64 executable.
To run the executable on an x86-64 Ubuntu system, you can use:
./helloIf you are running Ubuntu ARM64 on an Apple Silicon Mac, you may also be able to run it directly with:
./helloIf that does not work, use QEMU to run the x86-64 binary:
qemu-x86_64 ./helloYou should then see the following output in the terminal:
First Assembly Language Program for x86_64!See the attached screenshot.
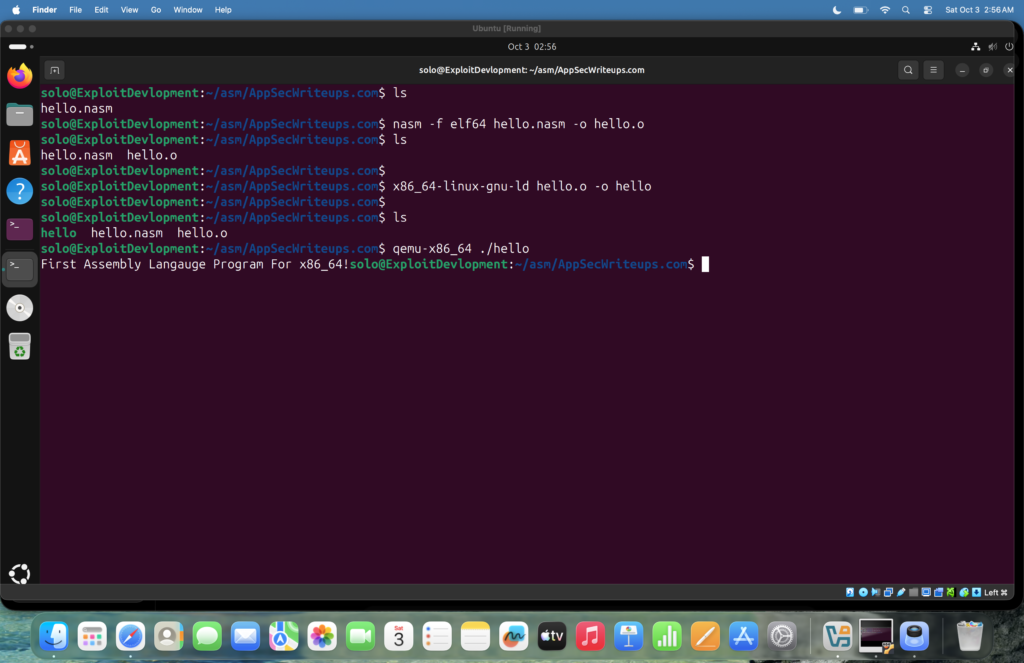
That’s it! Our first x86-64 Assembly program is now complete. We have learned how to define the .text and .data sections, use registers, perform the write syscall, calculate the message length, and finally exit the program using the exit syscall.
In the next part, we will continue learning x86-64 Assembly step by step with more practical examples.
Conclusion
That’s it! Our first x86-64 Assembly program is now complete.
In this part, we started with a basic Assembly program and learned how to:
- Define the
.textand.datasections - Use labels such as
_startandmsg - Understand basic registers such as
RAX,RDI,RSI, andRDX - Use the Linux
writesyscall to display our message - Calculate the message length using
equ - Use the Linux
exitsyscall to terminate the program - Assemble, link, and run our x86-64 Assembly program
This is just the beginning. In the next part, we will continue learning x86-64 Assembly step by step and explore more instructions, registers, and practical examples.
Thanks for reading, and see you in the next part!

![ASM[01] — [x86-64] Assembly Language: Environment Setup](https://appsecwriteups.com/wp-content/uploads/2026/10/additionalMacSetupTools-150x150.png)