Hello everyone! I’m Jivan, and in this post I want to share the application security testing setup I use for my bug bounty research.
Over time, my testing has expanded from web applications to API, Android, iOS, thick-client applications, and large-scale reconnaissance.
Because every platform has different requirements, I don’t use one environment for everything. I use my local machine mainly for application security testing, while my large-scale reconnaissance runs on a cloud-based Kali Linux VPS.
This post explains how I currently organize my setup and the tools I use.
🌐 Web & API Pentesting Setup
For web application and API testing, my main tool is Burp Suite.
I use Burp Suite for:
- Intercepting HTTP/HTTPS requests
- Modifying parameters and headers
- Testing authentication and authorization
- Testing API endpoints
- Testing access-control issues
- Replaying requests
- Comparing requests and responses
- Retesting vulnerabilities
I prefer understanding how an application works and then manually testing interesting functionality rather than relying only on automated scanners.
For API testing, I commonly investigate things such as:
- User IDs
- UUIDs
- Object references
- Roles and permissions
- API parameters
- HTTP methods
- Authentication tokens
- Access-control mechanisms
📱 Android Pentesting Setup
For Android application security testing, I use Android Studio as one of the main parts of my setup.
My Android testing environment includes:
- Android Studio
- Android Emulator
- ADB
- Frida
- Objection
- Burp Suite
Android Studio
Android Studio is useful for managing my Android testing environment, including creating and managing emulators, installing applications, debugging, and testing different Android configurations.
ADB
I use ADB (Android Debug Bridge) to communicate with Android devices and emulators.
It is useful for tasks such as:
- Installing APKs
- Accessing the Android shell
- Pulling application files
- Checking application information
- Managing the testing device
Frida
For dynamic analysis, I use Frida.
Frida allows me to investigate application behavior at runtime and is useful when static analysis alone does not provide enough information.
Objection
I also use Objection for Android testing.
Objection works with Frida and provides a convenient way to perform runtime application analysis.
Depending on the application and testing environment, I use it to investigate areas such as application behavior, storage, runtime information, and other security-relevant functionality.
Burp Suite
When an Android application communicates with backend APIs, I route its traffic through Burp Suite.
This allows me to inspect and manually modify the requests sent between the application and its backend.
iOS Pentesting Setup
My iOS setup is different from my Android and thick-client setup.
For iOS pentesting, I specifically use my MacBook.
My iOS testing environment includes:
- MacBook
- iPhone 7
- Burp Suite
- Frida
- Objection
- iOS application analysis tools
I use both static and dynamic analysis depending on the application and testing environment.
💻 Why I Use a MacBook for iOS Pentesting
I specifically use my MacBook for iOS security testing rather than my Windows environment.
My iOS testing tools are installed directly on my MacBook, which gives me an environment where I can work with iOS applications and perform both static and dynamic analysis.
The MacBook is also useful when a physical iOS device cannot run a particular application because of its required iOS version.
📱 iPhone 7 for iOS Testing
I use an iPhone 7 for iOS application security testing.
It is useful for both:
- Static analysis
- Dynamic analysis
I can combine the physical device with tools such as Frida, Objection, and Burp Suite during testing.
However, there is an important limitation.
The iPhone 7 is an old device and runs an older version of iOS. Because of this, it is not compatible with every modern iOS application.
For example, some applications may display an error similar to:
“The current version requires iOS 18.0 or later.”
When this happens, I cannot install that particular application on my iPhone 7.
In those situations, I use my MacBook to work with the application when it supports macOS-based analysis or can otherwise be obtained and analyzed in my Mac environment.
This gives me an alternative when the physical iPhone is too old for the application.
🔬 iOS Static & Dynamic Analysis
I generally divide my iOS testing into two areas.
Static Analysis
During static analysis, I inspect the application and its files without relying entirely on runtime behavior.
Depending on the application, I look at:
- Application structure
- Configuration files
- Resources
- Strings
- API endpoints
- Security-related configurations
- Interesting application logic
Dynamic Analysis
During dynamic analysis, I investigate what the application actually does while it is running.
My main tools for this include:
- Frida
- Objection
- Burp Suite
This combination allows me to investigate runtime behavior as well as communication with backend services.
🔬 Frida & Objection for Mobile Testing
Frida and Objection are important parts of both my Android and iOS testing workflow.
I use Frida for runtime instrumentation and dynamic analysis.
I use Objection together with Frida when I want a more convenient interface for investigating application behavior.
Having these tools available for both Android and iOS allows me to use a similar dynamic-analysis approach across mobile platforms.
🖥️ Thick Client Pentesting Setup
For thick-client application testing, I use a Windows-based environment.
My thick-client testing approach is similar to web and mobile testing when the desktop application communicates with backend services.
The main tools I use include:
- Burp Suite
- Fiddler
- Windows environment
Burp Suite
When a desktop application uses HTTP/HTTPS communication, I can use Burp Suite to intercept and modify the traffic.
This helps me investigate whether important security controls are actually enforced by the backend.
Fiddler
I also use Fiddler for inspecting and analyzing application traffic.
It is useful when I need to understand how a Windows desktop application communicates with its backend services.
☁️ My Cloud-Based Reconnaissance Setup
One of the biggest changes I made to my workflow was moving my reconnaissance from my local machine to a cloud-based VPS.
For roughly the last year, I have been using a cloud VPS running Kali Linux for my reconnaissance work.
My local machine is mainly used for:
- Android testing
- iOS testing
- Mobile application analysis
- Burp Suite
- Other application security work
I don’t keep my entire large-scale reconnaissance setup running locally.
Instead, my reconnaissance tools are installed on my VPS.
🤔 Why I Moved Recon to a VPS
When performing reconnaissance against a large number of domains, using a local machine can become inconvenient.
For example, if I am enumerating a large wildcard scope belonging to a large organization, the process can involve:
- Large numbers of subdomains
- Port scanning
- HTTP probing
- Service discovery
- Vulnerability scanning
- IP-based reconnaissance
Some targets have a very large attack surface, so these scans can take a long time.
If everything runs on my local machine, I need to keep the machine running and maintain an active internet connection throughout the process.
A cloud VPS solves this problem for my workflow.
Once I start a scan on the VPS, the process can continue running independently while my local machine is offline.
This means I can start a large reconnaissance job, disconnect from the VPS, and come back later to review the results.
For me, this is one of the biggest advantages of using a VPS.
Advanced Real Bug Bounty Case Studies – Volume 1
Learn bug bounty hunting through real vulnerability case studies. Discover how XSS, HTML Injection, IDOR, and Broken Access Control vulnerabilities are identified, validated, and responsibly reported using practical, real-world examples instead of intentionally vulnerable labs.
🐧 Kali Linux on My VPS
My VPS runs Kali Linux, which gives me a familiar environment for reconnaissance and security testing.
Some of the tools I use include:
- Findomain
- Nuclei
- Nmap
- Naabu
- httpx
- Other reconnaissance and enumeration tools
These are tools that many bug bounty hunters also use in local environments. The difference in my setup is that I run them on my cloud VPS instead of keeping the entire reconnaissance workflow on my local machine.
🔎 Subdomain Enumeration
For example, I can use Findomain for subdomain enumeration.
A simple example of running a scan in the background is:
nohup findomain -t example.com -o &Using nohup allows the process to continue running after I disconnect from the terminal session.
The results are saved on my VPS so I can review them later.
For large scopes, this is very convenient because I don’t have to keep an SSH session open while waiting for enumeration to finish.
🔍 Port Scanning
After obtaining a large list of subdomains, I can perform port scanning with tools such as Naabu.
For example:
nohup naabu -l large-subdomains.txt -top-ports 1000 -rate 1000 -o openPorts.txt > naabu.log 2>&1 &This allows me to scan the top 1,000 ports across the supplied list and save the results to a file.
I can then review the discovered open ports and continue with additional enumeration.
For production bug bounty programs, I always make sure the targets and scanning activity are within the program’s allowed scope and rate limits.
🌐 HTTP Probing & Vulnerability Scanning
After discovering subdomains and open services, I can use tools such as:
httpx
for identifying reachable HTTP/HTTPS services.
I also use:
Nuclei
for template-based vulnerability checks where appropriate.
The general workflow can look like:
Subdomain Enumeration → DNS/Host Validation → Port Scanning → HTTP Probing → Vulnerability Checks → Manual Testing
The automated tools help me reduce the amount of repetitive work, while the interesting results are then manually investigated.
🎯 Domain-Based & IP-Based Recon
Another important part of my reconnaissance is that I don’t focus only on web domains.
During reconnaissance, I can also discover:
- IP addresses
- Open ports
- Exposed services
- Development environments
- Administrative interfaces
- Other internet-facing infrastructure
This is useful because a company’s external attack surface is not always limited to its main websites.
Sometimes an interesting service may be exposed directly through an IP address rather than through an obvious subdomain.
When such infrastructure is within the authorized bug bounty scope, I can investigate it further.
🌙 One Advantage of My VPS Setup
One thing I particularly like about this setup is that my reconnaissance can continue while I’m away from my computer.
For example:
Start reconnaissance → Disconnect → Sleep / Work / Leave the computer → Return → Review results
The VPS continues running the process in the background.
I don’t need to keep my MacBook powered on for the entire duration of a long reconnaissance job.
This has made my workflow much more convenient, especially when dealing with large scopes.
💰 My Experience With the VPS Setup
I currently spend approximately $30 USD per month on my cloud VPS.
For me, the value of the VPS comes from the amount of reconnaissance and research I can continuously perform with it.
Over the past year, I have earned more than $4,000 USD in bug bounty rewards during the period in which I have been using this VPS-based workflow.
The VPS itself did not discover those vulnerabilities automatically. Rather, it allowed me to maintain a continuous reconnaissance workflow and identify interesting assets, services, and attack surfaces that I could then manually investigate.
Some of my research has involved discovering exposed services, administrative panels, open ports, and other interesting infrastructure that eventually led to valid security findings.
That experience is one of the main reasons I continue to pay for a cloud VPS.
🖥️ My Local Machine vs VPS
I keep the responsibilities fairly separate.
💻 Local Machine
My local machine is mainly used for:
- Android pentesting
- Android Studio
- Android Emulator
- ADB
- Frida
- Objection
- iOS pentesting
- iOS static analysis
- iOS dynamic analysis
- Burp Suite
- Application analysis
☁️ Cloud VPS
My VPS is mainly used for:
- Subdomain enumeration
- Reconnaissance
- Port scanning
- HTTP probing
- IP discovery
- Nuclei scanning
- Large-scale asset enumeration
- Long-running background scans
This separation works well for me because my local machine remains available for hands-on application testing while the VPS handles long-running reconnaissance tasks.
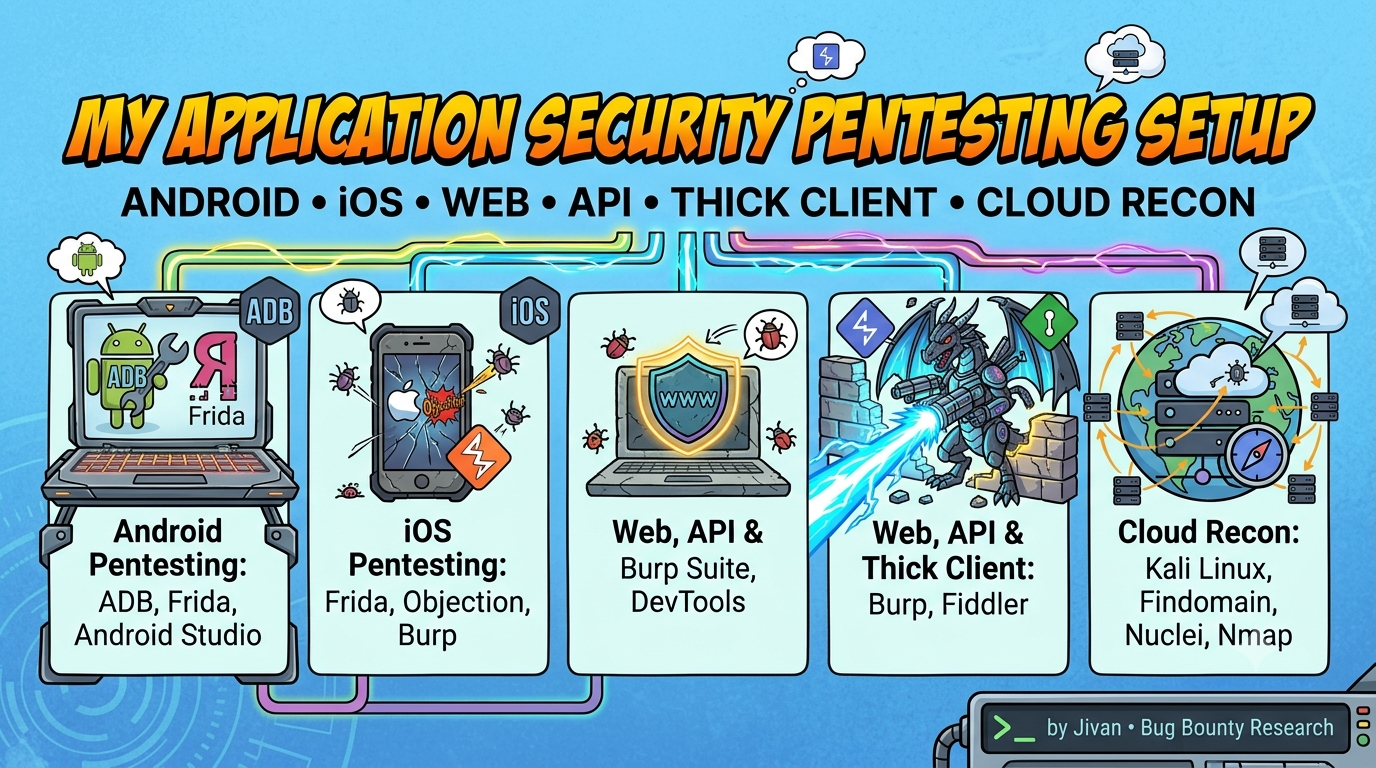
🗂️ My Current Setup at a Glance
| Area | Environment | Main Tools |
|---|---|---|
| Web | Local machine | Burp Suite, Browser DevTools |
| API | Local machine | Burp Suite |
| Android | MacBook + Emulator/Device | Android Studio, ADB, Frida, Objection, Burp Suite |
| iOS | MacBook + iPhone 7 | Frida, Objection, Burp Suite |
| Thick Client | Windows | Burp Suite, Fiddler |
| Recon | Cloud VPS + Kali Linux | Findomain, Nmap, Naabu, httpx, Nuclei |
🔄 My Overall Bug Bounty Workflow
My overall workflow can be summarized as:
Recon → Understand → Intercept → Analyze → Manipulate → Validate → Report → Retest
1. Recon
I use my cloud VPS to continuously enumerate domains, subdomains, IP addresses, ports, and services.
2. Understand
Once I find an interesting target, I first try to understand how the application or service works.
3. Intercept
For applications communicating over HTTP/HTTPS, I use Burp Suite or Fiddler depending on the platform.
4. Analyze
I manually analyze application behavior, APIs, authentication, authorization, and other security controls.
5. Manipulate
I modify requests, parameters, identifiers, headers, and other relevant inputs to test the application’s security controls.
6. Validate
If I find something interesting, I reproduce it and confirm the actual security impact.
7. Report
After validating the issue, I prepare a detailed vulnerability report with the reproduction steps and impact.
8. Retest
If the company fixes the vulnerability, I retest the issue to confirm whether the fix works correctly.
🛠️ My Main Security Tools
Web & API
- Burp Suite
- Browser Developer Tools
Android
- Android Studio
- Android Emulator
- ADB
- Frida
- Objection
- Burp Suite
iOS
- MacBook
- iPhone 7
- Frida
- Objection
- Burp Suite
Thick Client
- Windows
- Burp Suite
- Fiddler
Recon
- Kali Linux
- Findomain
- Nmap
- Naabu
- httpx
- Nuclei
- Other reconnaissance tools depending on the target
⚠️ A Few Important Things About My Setup
Having a VPS does not mean that every target should be scanned aggressively.
For bug bounty programs, I always need to check the program’s scope, automation policy, rate limits, and prohibited testing techniques before running scans.
A tool such as Nmap, Naabu, or Nuclei can generate a significant amount of traffic depending on its configuration, so I adjust the scanning approach according to the program’s rules.
The goal of my VPS setup is to make reconnaissance more organized and continuous, not to generate unnecessary traffic.
🚀 Final Thoughts
My setup has changed quite a lot as I moved from basic web testing into mobile, thick-client, and larger-scale reconnaissance.
Today, I keep my workflow divided between my local machine and cloud VPS.
My local machine is where I perform hands-on application security testing.
For Android, I use Android Studio, ADB, Frida, Objection, and Burp Suite.
For iOS, I specifically use my MacBook, together with my iPhone 7, Frida, Objection, and Burp Suite. The iPhone 7 is useful for compatible applications, while the MacBook gives me another option when an application requires a newer iOS version than my device supports.
For thick-client testing, I use a Windows-based environment with Burp Suite and Fiddler.
For reconnaissance, I use a cloud-based Kali Linux VPS running tools such as Findomain, Nmap, Naabu, httpx, and Nuclei.
The biggest advantage of this setup is that my reconnaissance does not have to stop when I stop using my local computer. Long-running enumeration and scanning jobs can continue on the VPS while I focus on other research.
This setup has become an important part of my bug bounty workflow, and I expect it to continue evolving as I explore more areas of application security and vulnerability research.
Thanks for reading, and I hope this gives you a useful overview of how I organize my Android, iOS, web, API, thick-client, and reconnaissance testing.
Keep learning, keep testing, and always respect the scope. 🔐